This post will explain how to host a WordPress website on Amazon Cloud for Free (install WordPress on AWS). This will be on a Linux server that’s free tier eligible with a small CPU, memory, storage, and networking capacity (1 vCPUs, 2.5 GHz, -, 1 GiB memory, EBS only).
Choose a hosting provider:
You will need a more prominent WordPress instance that won’t be free to meet higher computing needs. Or use a hosting provider like Namecheap, Bluehost, or WebHosting Pad. These hosting providers (hosting services) allow you to install WordPress and manage your WordPress instance. Read below about Hosting WordPress site and how to install WordPress.
Recommended reading:
- Best Web Hosting for WordPress 2023 – choose any hosting provider from this article.Note: The web host you choose to power your WordPress site plays a key role in its speed and performance.
- Top 9 Key Enabling Technologies in Cloud Computing
What is AWS?
Amazon Web service provides scalable, secure on-demand cloud computing. Think about this in a way where you can rent some PCs and do what you want with them, including creating servers to host WordPress websites.
Why should I use Amazon Cloud?
Amazon Cloud is recognized for its availability and stability. Most data centers have nearly 100 percent downtime. Amazon’s web servers won’t be impacted. Amazon Cloud is a powerful cloud computing platform!
Sign up for an AWS Free Tier Account
The AWS free membership provides a free experience on the AWS service platform for 12 months. The easiest way of starting AWS. Log into this site. It includes 500 hours of Linux t2 micro instances over 1year. Do note the Free Tier requires a minimum number of micro instances in EC2 for free usage to remain.
Already have an AWS account?
If you already have an AWS free account and know how to navigate the management console.
Let’s dive deep to learn how to install WordPress website on Amazon Cloud!
Firstly, because you need a security group for the WordPress instance, go to the VPC section in your AWS account management console, and start creating the security group as explained in the following steps.
With security groups, you can allow specific traffic on your AWS EC2 instance by enabling the protocol and the source. In our example, we need to allow HTTP traffic to browse the website via an internet browser and enable SSH to connect to the server to do some server configuration. Give your new Security Group a name; in this example, I will name it “WPSite-SG,” add some description and choose the VPC you’re working in or the default one.
Enable inbound rules: HTTP and SSH
For security purposes, you might want to specify the IP address to SSH from onto your server. For this example, I am choosing 0.0.0.0/0 (anywhere) – this is open to the world, which is OK for this practice. However, this should never be the case in real-world scenarios.
Create EC2 instance for the WordPress website:
An AWS instance is a virtual server in the cloud. You’ll need this to install WordPress. You get to decide on the kind of AWS instance you want to use to install WordPress on AWS.
Go to the EC2 section of the AWS platform and click on “Launch instance.” This is going to be your WordPress instance.
Make sure to select “Free tier only” from the left.
After you select this Amazon instance Image, choose “t2.micro,” which is free tier eligible so that you don’t pay for it.
Install WordPress on AWS:
Go next to Configure Instance Details. The one main thing you need to worry about on this page is the “User data” box in the Advanced Details section, and this is where you need to use the below bootstrap script to install an Apache web server and install WordPress on AWS virtual machine:
#!/bin/bash
yum update -y
yum install httpd php php-mysql -y
cd /var/www/html
echo "healthy" > healthy.html
wget https://wordpress.org/wordpress-5.1.1.tar.gz
tar -xzf wordpress-5.1.1.tar.gz
cp -r wordpress/* /var/www/html/
rm -rf wordpress
rm -rf wordpress-5.1.1.tar.gz
chmod -R 755 wp-content
chown -R apache:apache wp-content
wget https://s3.amazonaws.com/bucketforwordpresslab-donotdelete/htaccess.txt
mv htaccess.txt .htaccess
chkconfig httpd on
service httpd start
Keep going to the next steps until you get to “Configure Security Group” you have to select the security group we created above, “WPSite-SG.”
Then click on “Review and Launch,” where you can review your WordPress instance launch details before launching. After you review it, click the “Launch” button.
Give it a few minutes until your WordPress instance is up and running; you will be able to SSH to it, and if you go /var/www/html, which means apache was installed successfully as part of the bootstrap script, we provided above. Also, there will be WordPress files downloaded.
You can connect to your EC2 instance in AWS Console by clicking the “Connect” button. Or, use client software like Putty to SSH to the server.
The next step is installing MySQL server on the EC2 instance.
How to install MySQL server on Amazon Linux EC2 server?
Run the following commands in your EC2 Linux terminal:
sudo su

wget https://dev.mysql.com/get/mysql57-community-release-el7-11.noarch.rpm

yum localinstall mysql57-community-release-el7-11.noarch.rpm

yum install mysql-community-server

systemctl start mysqld.service
How to get the default MySQL root password?
You will need this password to connect to the database server to manage the databases and create other users.
grep 'temporary password' /var/log/mysqld.logHow to connect to the database?
mysql -u root -h localhost -pYou will be prompted for the password; use the one you “grepped” as per the step above.
How to change the root password on MySQL?
ALTER USER 'root'@'localhost' IDENTIFIED BY 'New-Password-Here';Now, create a user and grant all privileges to all databases
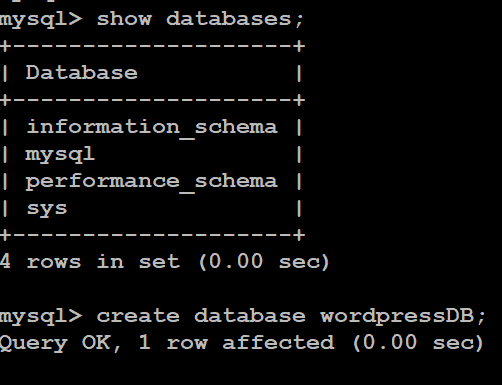
GRANT ALL ON *.* TO SOME_USER@'%' IDENTIFIED BY "THE_PASSWORD";you can run this query to show the databases. Some will be there by default when you install the MySQL server:
show databases;Create a MySQL database for your WordPress website:
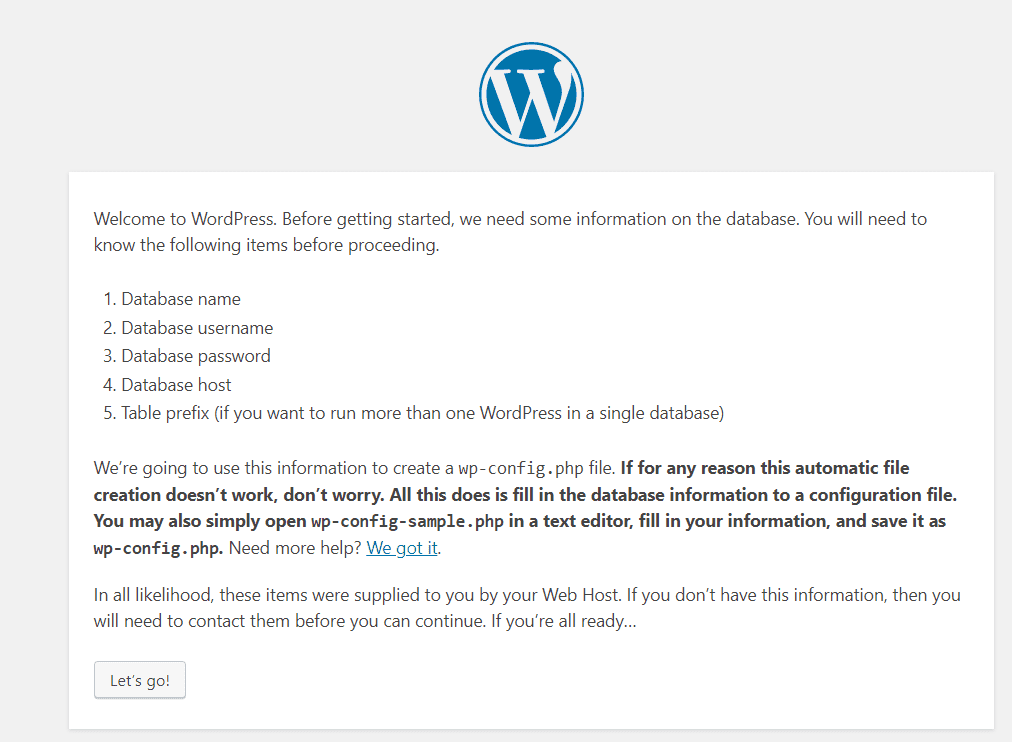
create database wordpressDB;Now, if you type the public IP address (instance’s IP address) in a web browser, you will land on the “Welcome” page of the WordPress site.
To continue the setup, you must know the following items before proceeding.
- Database name
- Database Username
- Database password
- Database host
- Table prefix (if you want to run more than one WordPress site in a single database)
Database Setup:
That info we can get from the MySQL server we set up earlier on the same host.
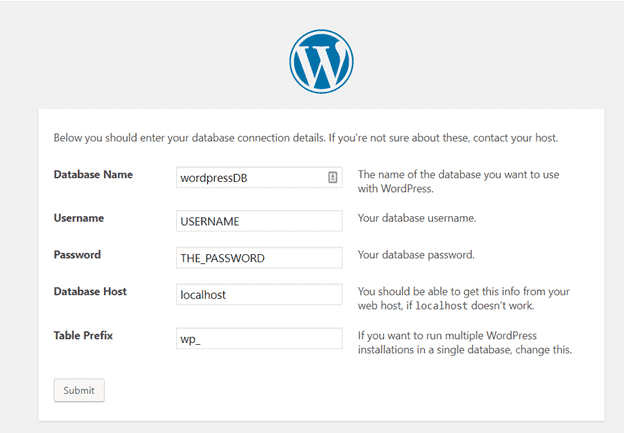
- Database name: case-sensitive database name (wordpressDB)
- Database username: Whatever Username you specified (i.e., admin)
- Database password: Whatever user Password you specified
- Database host: localhost (because it’s installed on the same EC2 instance)
- Leave it as it is (wp_)
Then click “Submit.”
Enter the database details on the WordPress site main page (EC2_Public_IP/wp-admin/setup-config.php)
When you’re done, click the “Submit” button on the WordPress admin page.
Note: Database Name is case sensitive
Create the “wp-config.php” file:
When you click the “Submit” button on the previous page (as shown above), you will get this page that says it can’t write to the “wp-config.php” file. You will need to create this file manually.
You must manually create a file called “wp-config.php” in /var/www/html and paste the text you see in the screenshot above inside this file.
Finally, make sure to save and close the file and when you finish, click “Run the installation”
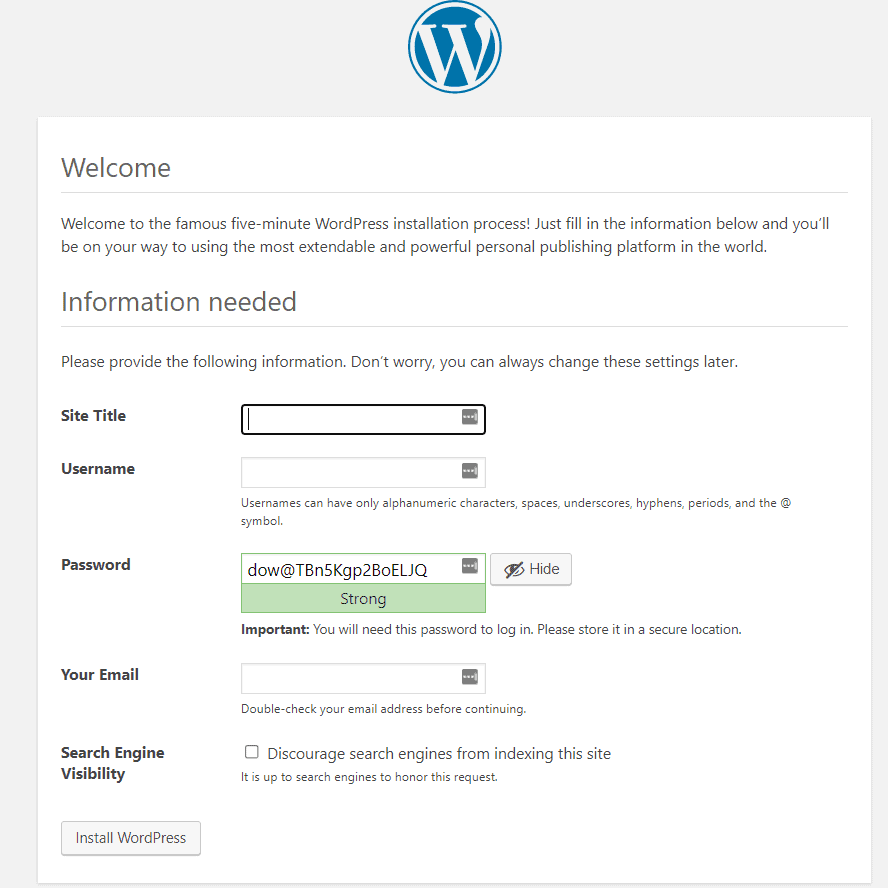
You will see this page. This is your WordPress site‘s Welcome page.
Fill in the information in the fields above, choose a strong password, and remember it as needed to log in to your WordPress site.
Click the “Install WordPress” button!
So, that was the last step! You now have a WordPress website up and running!
This will complete WordPress deployment.
Note: You will need to update your PHP and WordPress site versions.
If you go to your WordPress dashboard, you will see this message:
An updated version of WordPress is available.
- You cannot update because WordPress 5.7.2 requires PHP version 5.6.20 or higher. You are running version 5.4.16.
- You can update to WordPress 5.1.10 automatically
for you to be able to do this, you need to change the permissions on one of your Linux server directories. Do this:
SSH to your server and run:
chown -R apache:apache /var/www/htmlBecause you will need to update the WordPress theme and plugins, update PHP first, as explained below:
Update PHP:
sudo su

###the command below will list extras to install###

amazon-linux-extras install

amazon-linux-extras install php7.4
make sure to restart the apache server after the update
systemctl stop httpd.service
systemctl start httpd.service
### OR ###
systemctl restart httpd.service
===========================================================
Now, if you go to your WordPress dashboard, you can run all the updates and install the latest WordPress version.
Conclusion:
Amazon is no longer ‘just’ a retail giant. It also dominates the field when it comes to cloud hosting. I hope you found this post, “install WordPress website on Amazon Cloud” helpful.
How did you find this tutorial? Have you done AWS WordPress hosting on AWS or any other cloud hosting? Let us know any questions or WordPress & AWS hints ‘n tips in the comments.


